Rangecast FAQ
[FAQ-1322] Example of script construction
Page Type: REFERENCE
OVERVIEWLine-by-line illustration of two scripts, showing how the view is modified at each step by the application of successive rules acting upon the list of available channels. (A script is an efficient method to organize channels onto buttons in the player.)
BACKGROUNDA script works by taking a set of channels (this can be all or some of the channels available to the customer), putting them in a workspace, and then applying a series of rules that operate on these channels. Lines in a script are rules that describe some category of these channels, and does something specific to those channels. Then the next line modifies the layout by applying another rule.
Typical rule actions include moving channels onto buttons (and in the process, creating the buttons if they don't already exist), defining the sequence in which the buttons are presented, and setting the mode of each button (e.g. off, scan, priority.) The names of buttons can be automatically generated based on the properties of the channel (jurisdiction, agency type, frequency, etc.)
In general, scripts are composed of three kinds of lines:
a) An initial line which names the view, and defines which of the available channels will be brought into the workspace
b) Layout commands that describe properties like the size of the buttons to create, or the number of columns
c) Rules that work on the channel list, and craft it into the design you wish
It's important to know that when creating a script, you are not defining the sections of the screen in sequence (the first line creating buttons, then the second line creating the next buttons, etc.) Scripts are built out of a series of rules that effectively say "now you take all the channels like this, and do that with them."
METHODTo illustrate these concepts, we'll unpack the meaning of two scripts. The first is a short script with only a single rule (so you can see how a rule is constructed, and how a single rule can do something useful with all channels.) Then we will look at a longer script, with step-by-step illustrations, so you can see how rules are applied in sequence to create more complex patterns.
Our first script is fairly short, consisting of only three lines.
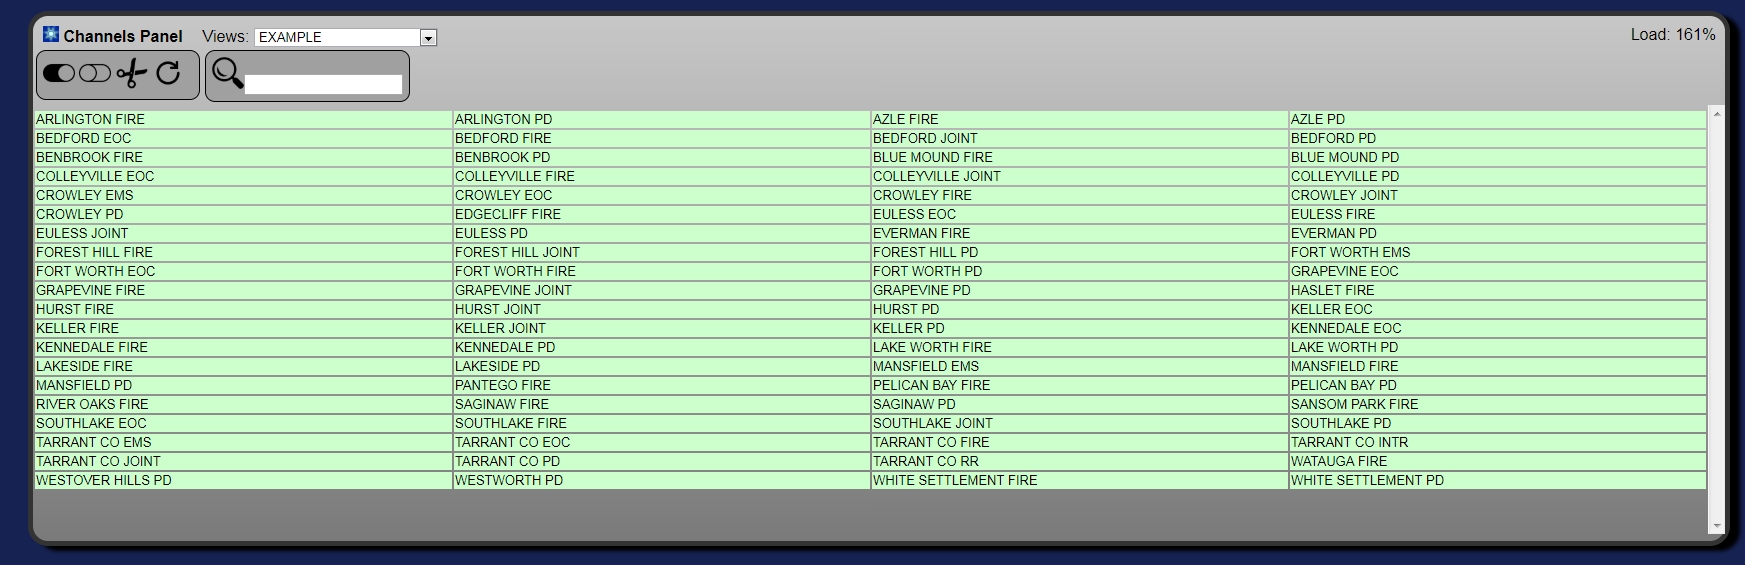
view EXAMPLE < TX03
width 400
scan "%city %agency" all
The first line names the view (EXAMPLE) and brings in only channels from a specific county (TX03 = Tarrant County.) A list of geocodes can be found on the Rangecast website, or in in the programmer. Geocodes can be specified to two characters for a state (TX), four characters for a county (TX03), or six characters for a specific jurisdiction (e.g. TX0300 is for Tarrant County operations like the sheriff, and TX0301 is for the largest city, Fort Worth.)
The second line defines the width of the buttons.
The third line takes all the channels in the workspace (everything in Tarrant County), and says to put each channel on a button with a name automatically generated from the local jurisdiction (%city) and agency type (%agency). This creates buttons with names like "Fort Worth Fire", without anyone needing to specifically name each button, or define what to do with each channel one by one. This takes advantage of information in our database that describes the properties of each channel.
The result of this script is the following view:
The first script had only a single rule, applied to all channels. Next we'll look at a longer script (11 lines), so we can see the effect of applying a series of rules in sequence.
Here is the script:
view EXAMPLE < all
width 300
newlines 1 2 3 4 5
scan /5 "TEXAS DPS" A00071
finish A00071
off /5 "%county" all
scan /4 "%county %agency" TX02 TX03
scan /3 "%city %agency123" TX0201 TX0204
scan /2 "%city %agency123 %freq" TX0201+P1
priority /1 "%city %agency" TX0203
scan /6 "%agency" E I R
This script generated the following view. (Note: in the color theme used in this example, the background color of a button has the following meanings: blue = priority, green = normal scan, gray = off. In addition, the button containing the channel playing at the time of the screenshot is highlighted in yellow. When using the Rangecast player, the meanings of colors will depend on your selected color theme, and may differ from what is shown here.)

We can break this script into the three sections described above.
a) An initial line which names the view, and defines which of the available channels will be brought into the workspace
LINE 1: view EXAMPLE < all
In the script, the first line names the view, and defines the starting condition (what channels are brought into the view.)
b) Layout commands that describe properties like the size of the buttons to create, or the number of columns
LINE 2: width 300
This line defines the width of the buttons. The length is made somewhat longer than the default width, because we are combining channels onto only 62 buttons, so there will be space available for names that are not too compressed.
LINE 3: newlines 1 2 3 4 5
This line also controls the visual layout, by creating line breaks at certain points in the button list. The effect of this line cannot be understood without seeing the rule lines that follow. At the end of this document, we will review the operation of this line with that background presented.
c) Rules that work on the channel list, and craft it into the design you wish
Here is the remainder of the script:
scan /5 "TEXAS DPS" A00071
finish A00071
off /5 "%county" all
scan /4 "%county %agency" TX02 TX03
scan /3 "%city %agency123" TX0201 TX0204
scan /2 "%city %agency123 %freq" TX0201+P1
priority /1 "%city %agency" TX0203
scan /6 "%agency" E I R
We'll now discuss these lines in more detail. At most steps, we'll illustrate with a screenshot what the view would look like, if we stopped at that point.
LINE 4: scan /5 "TEXAS DPS" A00071
This is the first time we do something with channels. The keyword "scan" means we are putting channels into the normal scan mode. The text in quotes (TEXAS DPS) is the name of a button we are creating. The code afterwards (A00071) is the ID in the channel database for a predefined group of channels associated with the Texas Department of Public Safety (this code was taken from the programmer.)
LINE 5: finish A00071
This protects the Texas DPS channels from being modified by the following rules. (We're about to group content by county, and this would automatically put the DPS channels onto a "Texas Statewide" button. By locking down the DPS channels, we ensure they stay on the "Texas DPS" button.)
LINE 6: off /5 "%county" all
This takes all remaining channels (everything except Texas DPS) and groups them onto one button for each county, where the buttons are all turned off. The text in the quotation marks is the name of the button to create, but the special keyword %county is interpreted to mean (for each channel) the name of its county. So, for example, all channels in Tarrant County are told to go on a button named "Tarrant Co". In this way, all the channels in a county are funneled onto a single button.
At this point, we will look at the view that has been created. We will do this for each following rule, so we can see the effect that each rule has on the layout.

LINE 7: scan /4 "%county %agency" TX02 TX03
This line takes all the channels in two counties (TX02 = Dallas County, TX03 = Tarrant County; these geocodes are taken from the Rangecast geocode database), and places each channel on a button which is composed from the county name and agency type. For example, a Fort Worth police channel (along with every other police channel in Tarrant County) will be assigned to a button named "Tarrant Co Police". In effect, we're breaking apart the Dallas County and Tarrant County buttons into a more granular set of buttons, separated by agency type -- while leaving each of the smaller outlying counties on a single button that combines all of its agency types.
Note that the "Dallas Co" and "Tarrant Co" buttons previously shown are now missing (because all the content previously assigned to them has been removed from those buttons), and a new set of Dallas and Tarrant buttons have been created (in a different place in the view, and in scan mode instead of turned off.)

LINE 8: scan /3 "%city %agency123" TX0201 TX0204
This line takes two specific cities (Dallas = TX0201, Grand Prairie = TX0204) and assigns all channels in these two cities to buttons that are named for the city jurisdiction and the agency type, in a more detailed format. Whereas %agency would combine all police channels onto a button labeled "police", the %agency123 format divides fire and police channels onto three subcategories for dispatch, tactical, and talk. And more generally, we are pulling these two specific towns (Dallas and Grand Prairie) out of the Dallas County buttons, and creating city-specific buttons. The Dallas County buttons still exist, since they still have all the other towns in the county (excepting these two towns.)

LINE 9: scan /2 "%city %agency123 %freq" TX0201+P1
This line takes the Dallas Police Dispatch channels (TX0201 = Dallas, P1 = Police Dispatch, and the plus symbol means the rule only touches channels that have both properties) and further divides these onto a single button for each individual Dallas Police Dispatch channel. Each button will be labeled with the city and agency type, and the frequency of the specific channel.

LINE 10: priority /1 "%city %agency" TX0203
This line takes all the channels in one city (TX0203 = Irving), breaks them out of the Dallas County buttons, and puts them on a set of Irving buttons (one for each agency type.) In addition, these buttons are put into priority mode (meaning the audio will be given a higher priority in Monitoring mode - played immediately ahead of other traffic, jumping the queue if other audio is pending.)

LINE 11: scan /6 "%agency" E I R
Finally, this line takes all channels of three specific agency types (E = Emergency Management, I = Interoperations, R = Railroad) and puts them on a combined button dedicated to that one type of agency. Note that this will take any channels of these agency types, even from cities such as Irving or Dallas that we've just broken apart - for example, the Dallas EOC button vanishes because its content is relocated onto the general Emergency Management button.
SEQUENCE AND ARRANGEMENT OF BUTTONS
If no specific instructions are given, buttons are sorted alphabetically.
There are two kinds of specific instructions available in a script to control the layout and sequencing of buttons. Both of these instructions are illustrated in the example above.
First, buttons may be grouped into bins, and you control the order in which the bins are presented in the layout. When a rule creates buttons, e.g.:
LINE 6: off /5 "%county" all
.. the value after the slash is the ID of the bin (5), and all buttons created by this rule are placed in that bin. This is why the whole-county buttons (the ones turned off) are near the end of the view; these buttons are part of bin 5, which follows the buttons placed in earlier bins (bins 1 through 4).
Buttons within a single bin are sorted alphabetically by their label, and the bins are sorted alphabetically by their ID. Note: Bins are not sorted as numbers. Therefore, for example, a sorted sequence of bins may be /1 /10 /2 /3. This is an alphabetic sort, and bin IDs may include any mix of letters and numbers. If you want more than 9 bins, it's best to either use letters e.g. /A /B /C /CA /D /DA /DB, or numbers with the same number of digits e.g. /01 /02 ... /10 /11. There is no need to use every bin value in sequence (if you use numbers, they don't need to be consecutive) and it's a good idea to leave gaps, so if you want to insert a new bin between two existing bins, you don't have to change the IDs of all following bins.
Second, you can force a bin to begin with a new line. If this is done, as the first button in a bin is placed onto the view, it will be put on a new row in the first column. This lets you visually group related buttons, as is done above for most of the bins (all except for the three agency type buttons at the end in bin 6, which are allowed to flow directly after the county buttons in bin 5.)
This visual effect is done with the "newlines" command. A single "newlines" is placed in the script (location does not matter), and you list the ID of each bin that you want to start on a fresh line.
CITATIONSINDEX
- [FAQ-1285] INDEX - Hub Administration - Scripts and Views
Images shown - [block]